
Elevated Glute Bridges: Muscles Worked, and More
published by: Debbie Luna
reviewed by: Daniel Dominick TE, PTRP
Last Updated:
January 2, 2024
Elevated glute bridges are a more advanced variation of glute bridge where the feet are raised higher off the floor.
This is done so as to increase the overall range of motion of the exercise, better engaging the glutes and making the exercise more challenging as a whole.
Contents
Show
What are Elevated Glute Bridges?
The elevated glute bridge is a traditionally bodyweight compound exercise most frequently performed by at-home exercisers and calisthenics athletes seeking hypertrophy, mobility and strength in their lower posterior chain.
As can be guessed from its name, the elevated glute bridge is primarily a glute-focused exercise involving the feet being elevated high off the floor as the exerciser extends their hips upwards - forming a bridge with their body.
The use of a platform, bench or chair to elevate the feet aids in increasing total range of motion - of which means that the glutes and hamstrings are engaged to a greater degree, and that the lengthier time under tension will lead to greater overall development as well.
How to Do Elevated Glute Bridges
To perform a repetition of the elevated glute bridge, the exerciser will begin by first placing an elevated platform beneath their feet as they lie with their upper back against the floor.
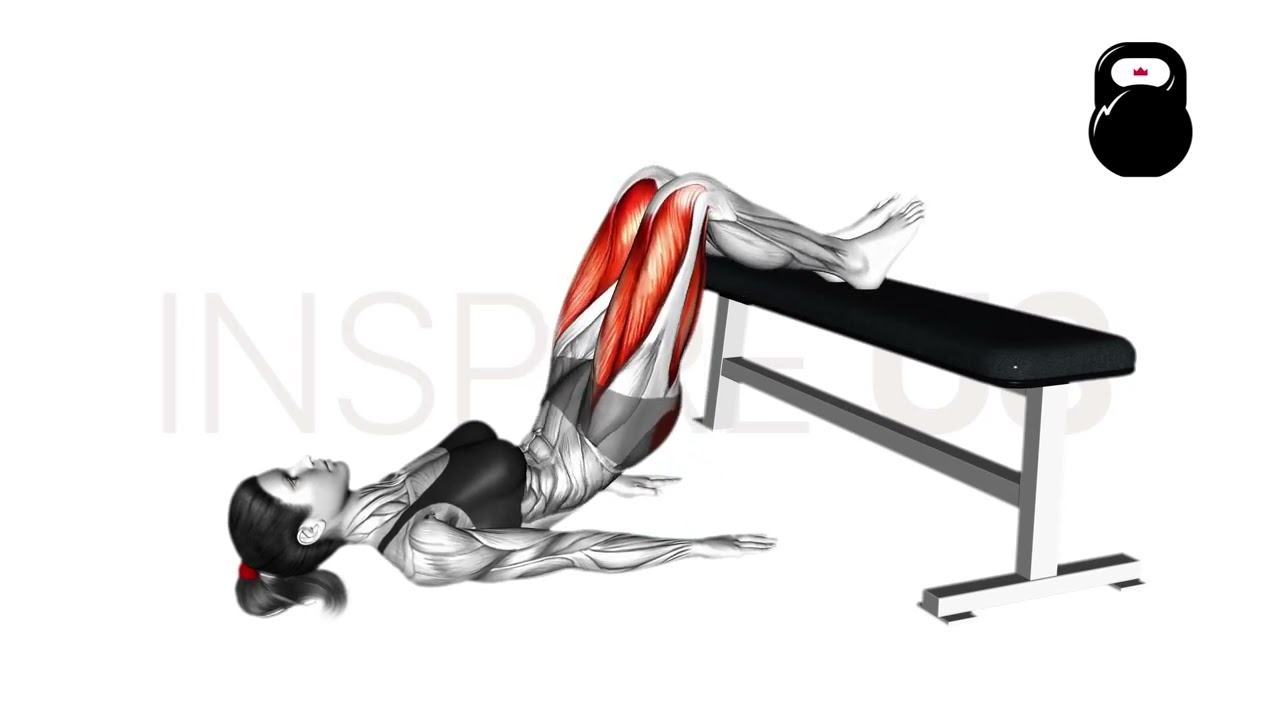
The knees should be partially bent as they assume this starting position, core contracted and arms spread out to the sides for stability. The base of the skull should further be resting atop the floor, a pillow to cushion it if needed.
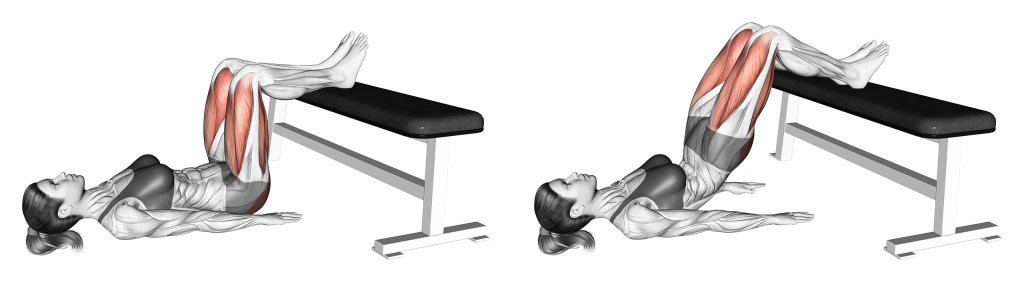
Once stable in this declined position, the exerciser then squeezes their glutes and pushes their hips outwards - forming a flat plane from knees to shoulders.
When the limits of their gluteal range of motion has been reached, the exerciser then slowly disengages the tension in their glutes and slowly lowers their hips back downwards. Once back in the starting position, the repetition is now considered to be complete.
Sets and Reps Recommendation:
Like their more conventional counterpart, the elevated glute bridge derives much of its training stimulus from high volume and tension, rather than weight or high intensity.
As such, exercisers new to glute bridges should stick to 2-3 sets of 10-18 repetitions.
What Muscles are Worked by Elevated Glute Bridges?
Although elevated glute bridges are considered to be a compound movement, they are only so in the strictest definition of the word. In actuality, glute bridges only truly work two main muscle groups - with the remaining simply being stabilizer muscles that exhibit isometric contraction.
These two muscle groups are referred to as “mover” or “mobilizer” muscles due to the dynamic contraction they exhibit, and are otherwise the principle focus of the movement.
Mover Muscles
The main target of elevated glute bridges are the gluteal muscles that make up the buttocks.
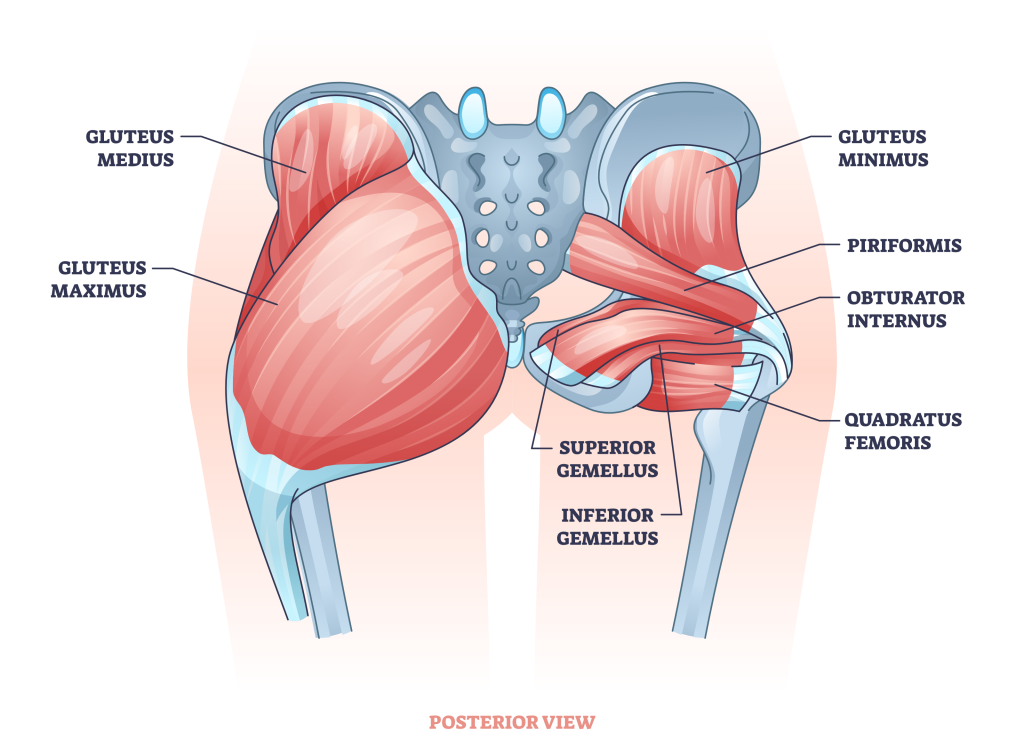
These muscles are (among others) responsible for extension of the hip, meaning that the entire movement pattern of the glute bridge is specifically catered towards the glutes themselves.
Because of its more dominant positioning and the larger range of motion involved, the gluteus maximus will benefit the most from performing elevated glute bridges, whereas its smaller sister muscles are targeted to an ever so slightly lesser degree.
Apart from the gluteal muscles, the muscles of the hamstrings will also be targeted in a secondary role as well. These are primarily to aid in initiation and stabilization of hip extension, as well as to help maintain knee flexion.
Stabilizer Muscles
Apart from the aforementioned hamstring and glute muscles, the elevated glute bridge will also work the hip flexors, abdominal muscles, quadriceps, erector spinae and obliques in the role of stabilizer muscles.
Unlike the dynamic mover muscles, the stabilizer muscles only contract in place, meaning that they receive far less development but are also taxed to a comparatively lesser degree during the exercise.
Common Elevated Glute Bridge Mistakes to Avoid
Although quite safe, ensure that you are not making the following common mistakes as you perform a set of elevated glute bridges.
Poor Range of Motion
The main benefit to elevated glute bridges lies in its large range of motion, ensuring the glutes and hamstrings are fully contracted with each repetition.
Failing to complete the entirety of this range can make the exercise less effective overall, and potentially lead to issues like sticking points or instability if practiced for an extended period.
Ensure that each rep peaks with the hips fully extended upwards, forming a diagonal downwards like towards the shoulders.
Rapid Tempo
Much like with any other exercise, performing the elevated glute bridge with an excessively quick tempo can reduce its effectiveness as a training tool. In order to properly hypertrophy the lower posterior chain, the muscles must be subjected to a sufficient length of time under tension.
Ensure that each repetition of the elevated glute bridge is performed in a slow and controlled manner, especially in regards to the eccentric phase of the movement. Aim to lengthen the entire repetition to as much as 2-3 seconds at a minimum, favoring the later half over the first half of the movement.
Excessive or Insufficient Elevation
Just as how the actual elevation of the feet may be adjusted to create a more or less intense exercise, exercisers may also make the mistake of performing the movement itself at the wrong elevation.
With the feet raised to the wrong height, the exercise can be far too difficult for exercisers of limited mobility or strength to complete. Likewise, the feet set too low can make the movement too easy for the exerciser’s current capabilities, leading to less effective training stimulus.
To get the most out of the exercise, the feet should only be elevated enough to raise the glutes off the ground, even at the start of the repetition.
Curving Lower Back
To reduce strain and any risk of injury that may be present, the lower back should remain flat and neutral throughout the entire set.
Curving the lower back by overextending the hips or failing to engage the core properly can create strain and stretch the spinal erectors to a disadvantageous length.
Apart from aiming to keep the abdominal muscles lightly activated, the exerciser should also ensure that they do not arch their lower back or otherwise tilt their pelvis in such a way that the lower back is removed from its neutral curvature.
Raising Head Off Floor
Much like poor lower back curvature, raising the head off the floor during a set of elevated glute bridges can also strain the spine - this time along the cervical section, however.
With much of the body’s weight distributed into the floor through the lower back, extending the neck in such a way can cause undue pressure along its internal structures, potentially leading to strain and injury if repeatedly done.
To maximize safety, aim to keep the head resting against the floor with the chin slightly tucked in. A cushion may also be used to aid with any discomfort felt.
Variations and Alternatives of the Elevated Glute Bridge
If elevated glute bridges aren’t challenging enough for you, try the two following variations - or swap it out entirely with an alternative.
One-Legged Elevated Glute Bridge
For an even greater challenge or for use as a progression exercise, the exerciser can perform the elevated glute bridge with only one leg atop the platform.
The other will be fully extended at the knee, greatly enhancing how much gluteal strength will be needed to complete each repetition.
Apart from requiring greater strength in the lower posterior chain, the one-legged variant of elevated glute bridge will also target the stabilizer muscles (core, quads, hip flexors) to a greater degree.
Double Elevated Glute Bridge
Exactly as it sounds; the double elevated glute bridge involves both ends of the body being elevated simultaneously, often with the use of tow inches or blocks.
Unlike the conventional elevated glute bridge, the double variant allows for an even greater range of hip flexion to be achieved during the start and end of the repetition. This, of course, equates to an overall larger range of motion and therein greater gluteal development.
Use the double elevated glute bridge if you find the single elevated bridge uncomfortable for whatever reason - or if you find it to be insufficient in terms of range of motion.
Resistance Band Kneeling Hip Thrusts
In cases where the lower back is of particular risk when in a lying position, exercisers may substitute the elevated glute bridge with the more upright kneeling hip thrust.
To maintain the same level of intensity and complexity, it is advisable to make this substitution with the addition of a light resistance band wrapped around the hips.
The kneeling hip thrust is performed with the exerciser sitting back on their heels before contracting their glutes and pushing their hips forwards - ending in a kneeling position. The addition of a band makes this movement significantly more intense on the lower posterior chain, further aiding with muscular development.
Frequently Asked Questions (FAQ)
What is the Difference Between Hip Thrusts and Elevated Glute Bridges?
Hip thrusts often involve the upper back being elevated, rather than the feet as is the case with an elevated glute bridge.
Although both target essentially the same muscles, hip thrusts are significantly easier and safer to load with free weights, and prevent a lower risk of discomfort and injury as far as the back and neck go.
What Height Should an Elevated Glute Bridge Be?
The exact height to which an elevated glute bridge is performed will depend on your mobility and strength. A good starting point is to see if you can maintain proper form with the feet elevated just below the knees at the start of the repetition.
More advanced exercisers with excellent mobility can even raise the feet higher than the knees, if needed.
Do Glute Bridges Make Your Waist Smaller?
Not necessarily. In most cases, attaining a smaller waist is simply a matter of reducing fat storage through restricting your caloric intake.
Although glute bridges do indeed burn a few calories over the course of several sets, using them for this purpose is inefficient and largely indirect. Instead, aim to eliminate high calorie foods from your diet and to take up light aerobic exercise like walking or swimming.
Remember to first speak to a medical professional prior to attempting a change in your diet or attempting new forms of exercise.
References
1. Tobey, Kelcy & Mike, Jonathan. (2017). Single-Leg Glute Bridge. Strength and Conditioning Journal. 40. 1. 10.1519/SSC.0000000000000323.
2. Alan, D. Tyson PT, SCS, ATC, CSCS. The Bridge. Strength and Conditioning Journal 22(6):p 46, December 2000.
Debbie (Deb) started powerlifting and Olympic lifting in High School as part of her track team's programming; She continues to train in order to remain athletic. Inspire US allows Deb to share information related to training, lifting, biomechanics, and more.
Inspire US serves as an informational hub for people looking to start their fitness journey.
The information on this website has not been evaluated by the Food & Drug Administration. The content is not intended to be a substitute for professional medical advice, diagnosis, or treatment. The information being shared is for educational purposes only. You must consult with a medical professional before acting on any content on this website.
Copyright © Inspire US 2025